Wednesday, March 30, 2016

A Form to be Reckoned With!

8-10 July 2009 – As I mentioned in the previous post, I was using scrap/crap wood to make the top oven slab form. Being basically cheap, I had scrounged pieces of wood to make the form not realizing what a critical part of cement work it is. I cut several pieces of plywood to act as a form bottom for the areas over the bays and the front span. Again, I jammed some scrap wood under the plywood and figured that was all I’d need to support the concrete poured on top. As you can see, the form was better suited to a load of packing peanuts. I was really lucky that the poured concrete did not collapse my rickety form while it was fluid & curing. It was a real heart stopper when I experienced the force that a yard of concrete can exert pushing out when poured into a form...again, I was really, really lucky I didn't end up with a big mound of concrete where my oven stand was supposed to be. I now appreciate when I see someone has installed a strong, braced form for ANY concrete work.

To back up a little, I had decided that I wanted to include an ash chute into the build. I didn’t want to be shoveling out the oven (or hauling ash & coals around) when Susan was setting a dinner table. Being able to pull the ash into a container to be dumped later (after the party) seemed a good idea. I researched and found that if you put a solid block of something into an area to be filled with concrete, it’s called a void form. Once the concrete hardens, the void form is removed and surprise...there is a “hole” in the concrete. I took two pieces of 2x4 the length of my projected oven opening, nailed and glued them together (what an idiot, over-achiever I was on that) and wrapped them in plastic. A couple of screws up through the plywood base piece and the ash slot was ready for the pour.

I used 3/8" rebar on the main slab and ran a couple of ½" rebar pieces paralleling the ash slot void form. I figured since the ash slot would be in the front span, a little extra strength wouldn’t hurt. I also had a couple pieces of angle iron and I simply laid them along the front edge of the span and over the left bay. The rebar was bent 90 degree into alternating holes of the side-wall blocks. These block holes would be filled with concrete, tying the sides into the top slab with not only concrete but rebar. The other holes were simply filled with crumpled newspaper and cardboard to keep out concrete...no need to fill all the holes.

As I mentioned in the FB forum, I attempted to mix all the cement myself for the top oven slab and alternate block holes. Two batches, two bags of ready-mix cement each and I realized that there was no way on earth I would be able to complete this job before things started seizing up.

In retrospect, one of the smartest things I did in this entire project was to call the local ready-mix delivery truck and have them bring me out a yard of concrete. Fortunately there was a truck available and he arrived before noon. I think he was quite amused with the form I’d built, but was really helpful and we got the slab poured. He showed me how to scree and float the slab so it was finished pretty nicely. It was interesting that this man said he remembered our house foundation was one of his first jobs...almost 40 years ago...wow!
The cement delivery driver was great and really helped a lot.
I especially appreciated that he didn't just stand back and laugh.
After the scree and float, the top slab actually looked good.
It truly was a marvel that the form actually contained the concrete!
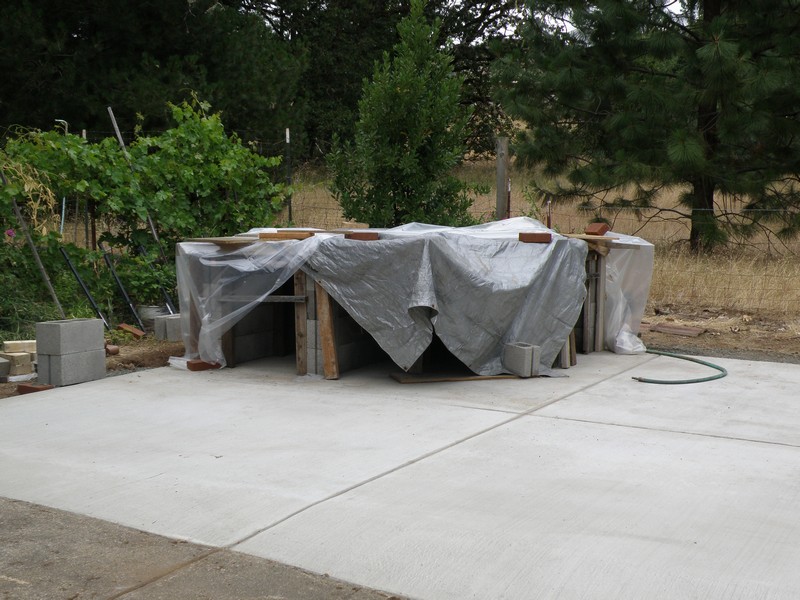
Covered and waiting for the cure...

The Oven Stand, Time to Dry Stack and Ponder Options!

While keeping the foundation slab moist as it cured, again I hit the books, the Forno Bravo forum, and the Internet. Confirmed, yes I’d really love to build a white oven, but the black oven was going to be much more realistic for my limited brick & mortar skills. I reviewed my downloaded FB plans and started figuring out my materials list. I am not good at visualizing details, so I picked up some concrete blocks and started to layout what would be my oven stand. I really never liked the “dark hole” used for wood storage under a lot of the ovens that I was seeing so Susan & I came up with something different that would give us some serious flexibility for storage and work surfaces...carts that rolled in & out of bays in the oven stand’s block base.

I talked to the welding instructor at Umpqua Community College where we worked and he said that building the bay carts would be a great project for one of his second year students. I’d have to wait until the oven stand was completed to get the measurements...but at least that part of the plan appeared to be a go.

I worked a bit more on the dry stacking for the oven stand until I felt I’d gotten the best fit for the foundation slab corner. Being basically cheap, I scrounged pieces of wood to make a form for the concrete top of the stand.

Note: When you dry stack block, you obviously will have a shorter stack than when you mortar that same stack of blocks. Not a big deal, but it can be significant! Just be aware that normally you will be adding about 1/4" with each mortar layer. So, mortar a stack of 4 blocks on a slab and it will be up to an 1" taller than a dry stack of 4 blocks...just saying, be aware!

Bought some block and started laying out possible patterns for the stand.
Placed a skimpy model of the oven footprint to check supports.
Decided on this design with two built-in cart bays and a central
block support for the main oven dome.

Finished the stack and added a piece of plywood to keep concrete
out of the back oven stand void. That plywood will be there forever.

Tuesday, March 29, 2016

Decisions, Decisions, Decisions...Corner Build with a Black Oven in the Pompeii (Dome) Style

I really wanted to build an oven like I’d seen in a little bakery in Victoria, British Columbia named Fol Epi. The custom oven was built by the current owner and head baker Cliff Leir and shop opened in 2009. Fol Epi’s “heart” is a large, white oven (designed with the firebox outside the cooking chamber) and their breads were the best I’d ever tasted. Victoria also has the Wildfire bakery (originally opened by Leir using another oven he built). Wildfire is also a bakery experience not to be missed–the remarkable white oven there is just what you’d expect to see in Europe in the late 1800's.

The main advantage of a white oven over a black oven design is better temperature control over long periods of time. Unfortunately, the price you pay for that long controlled bake is a  significantly higher build cost and a much more complex design (read difficult). Again, facing my obvious lack of brick & mortar skills (K.I.S.S. – keep it simple stupid) and recent retirement (read lower income), a black oven made more sense for us. If you are interested in white ovens, take a look at those two bakery web sites (below) and if you get a chance, visit Victoria and try baked goods from both Fol Epi  http://folepi.ca/about/  and Wildfire  http://wildfirebakery.ca/

Note: Do a Google search on Wood Fired Oven Bakeries and you’ll find there are many active WFOs in the artisan bread world....and all seem to be doing quite well. It is a special niche and compared to the mainstream commercial bakeries, they are really in the minority...but every one of these WFO establishments is run by people who love what they do and who are making phenomenal breads every day. Seek them out and sample their wares...you will always leave with a smile on your face!

Since I had no brick & mortar skills, I decided that a black, Roman style (Pompeii) oven would be more realistic for us/me to build. The Preliminary plans for a corner build oven on a large patio slab were agreed upon by Susan & I over a couple of our favorite microbrews. Based on the available space and my initial research, it appeared that the best size oven for us would be about a meter in diameter. The foundation slab would join our garage driveway aiming to present a seamless look to the addition and provide a clear path between the kitchen and the future outside den. Final excavation by a local contractor was completed for an 18'x18' foundation slab on 6/19/2009. The corner triangle (10' on the outside edges) was fitted with extra rebar to have a 6" layer of concrete. The remaining slab are would be 4" thick (with normal rebar). A layer of crushed rock was leveled & compacted into the bottom of the excavation, forms were set, and the concrete was poured & finished on the 24th of June. Instead of being level, the foundation slab was finished with a slight downward slope for drainage...common (and very handy) for rainy Oregon's patios.

Note: At the time I didn’t think about having people/parties in the now “dedicated” space–it seemed huge at the time. Once we'd built an enclosure around the oven and brought a table & chairs in for dining...and a cooling rack for bread...I now wish we would have built a bigger structure.
Laid some bricks out to designate corners of the foundation. Note that
Locator services had marked there were no utility lines in the area.

Excavation complete, crushed rock was compacted as a base. Far corner is
deeper to accommodate a 6" layer of concrete for better oven support. 

Foundation slab was poured and finished with a slight angle so water will
drain off to the right. Forms have been removed and concrete is ready for the build.

Sunday, March 27, 2016

Owning a WFO...Research and Questions

I initially spent a lot of time reading Kiko Denzer’s Build Your Own Earth Oven, but decided that the cobb (clay) oven would be fairly high maintenance here in rainy Oregon. I picked up a copy of The Bread Builders by Daniel Wing & Alan Scott and decided that a masonry, dome oven was our best choice–especially since my main interest was baking bread. An Internet search turned up the Forno Bravo website which really opened my eyes and raised my hopes that even I could build one of these beauties.

It’s been interesting over the years that even though Alan Scott’s designs are no longer recommended on this forum, The Bread Builders book is still a treasure trove of information and terminology for masonry oven history, design choices, construction techniques/terminology, and bread science. If you’re thinking seriously of building an oven, read this book first!

Based on my pre-build and post-build experiences, here’s a list of questions to ask yourself before you actually start on this project. It’s important to find out or seriously consider an answer for each question that is realistic for you and your location.

1) No matter how good you are at hunting down bargains, building a wood fired oven is going to be a significant investment in time and money. Are you (and all directly involved relatives), willing to commit to a long-term project like this?

2) What do you want to bake? Just pizza or do you want to bake a variety of items? Remember that access between the kitchen and the oven needs to be pretty good...tracking mud into the house will not make anyone happy nor will having no place to do prep work for the bake.

3) How much do you want to bake at a time and how often will you use the oven? Is the plan for entertaining often, doing an occasional pizza for two, or looking at semi-commercial oven use?

4) Where will the wood supply be stored? Is it going to be reasonably close to the oven? 

5) Do you have neighbors that might not like the inevitable start-up smoke or the noise of a enthusiastic gathering of friends (and can’t be bribed with an invite to the pizza party or a fresh loaf of bread)? It's worth a little investment of your time to get to know your immediate neighbors and make them aware of your plans.

6) Do you want to bake at all times during the year? Putting a roof over the oven is one of the best long term solutions to keeping the oven dry & available all year long. Even if you have to shovel snow between the kitchen and the WFO, you still can use it to make a pizza or some fabulous bread. Want more of a place to party rather than just a place to cook a pizza or two...consider a screened enclosure to keep the bugs and rain/snow out while keeping an outside experience for a group. From my experience, the 18'x18' Dragonfly Den has a max occupancy of 10-12...less if you are going to work the oven while they are all there and everyone wants to watch or help...size does matter here!

7) Will you need to have a building permit or some other government paperwork for your build or enclosure? When I checked with the building department, I made sure they knew that this was basically a controlled, outdoor cooking fire and I would not be connecting to an existing building, adding water, or power. Those seemed to be the magic words...no permit was required for me.

As I said at the beginning, you need to seriously think about each of these points before buying a bunch of fire bricks or thinking you'll just stack some bricks and have a working oven.

(p.s. If you're living with another person...you better make sure they are really on board with the project! Go over question 1 again with them.)


Saturday, March 26, 2016

Why would you want a Wood Fired Oven in your backyard?

Although the final touches on my Wood Fired Oven (WFO) were completed in May of 2012, I was convinced by several of my Forno Bravo forum friends that documenting the Dragonfly Den build would still be of value...especially if I added comments regarding what’s worked well...or could have used improvement. If you’re interested in an amazing journey into the world of masonry ovens, their builders, and the fabulous food that can be produced in one of these ovens...
join the forum at http://www.fornobravo.com/community/

As I started my documentation project, I soon realized that I wasn’t creating a “clean & clear” illustration of the build that was appropriate for Forno Bravo forum users–my build comments had simply become too extensive for this format. My solution was to split the more detailed build descriptions, rationales, and “insights for an improved build next time” into this Google blog and then develop a simple build thread for the forum.

I hope you find this story of my WFO build entertaining as well as informative (even though it obviously will contain lots of my biased thoughts and opinions). For those of you that just want the basic descriptions and pictures, my forum thread on Forno Bravo is http://goo.gl/rlLuM4

I especially want to express my thanks to Susan (fabulous cook, my best friend, and wife since 1971). Without her support, suggestions, and enthusiasm for this retirement project...I don't think I would have ever been able to bake bread or a pizza in our very own wood fired oven.

Along the way in this build document, my intent is to create pdf versions of sidebars like Recommended WFO Tool List, Suggestions for Large Pizza Party Prep, Baking Bread for the Neighborhood, etc. and make them available on this blog series and/or on my forum thread.

p.s. I've never worked with concrete, mortar, or bricks...and it's a little intimidating!

Mike & Susan at The Dragonfly Den oven with a bread batch.