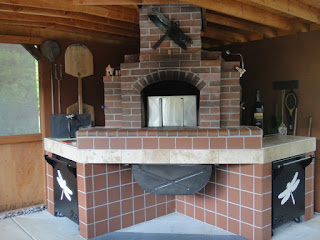
Both carts fit into their oven stand bays, so back they went to UCC to be finished (they are waiting for the sheet metal for the cart tops). It was early June, the den screening was completed and I got another call from Ian (the welding instructor at UCC) telling me that the two carts had been completed and I could pick them up. They had taken a silhouette of a dragonfly from one of my pictures and used the plasma cutter to create appliques for the cart ends. (In addition, Ian had made a light weight, sheet metal cooking door for me with an old coil handle from a broken welding tool. He had also tacked a small dragonfly cutout on the handle.)
The plan was that when the student finished our carts as his term project, I wanted him to put his initials on the endcap. So when I picked up the finished carts, each had a dragonfly silhouette and the student’s initials JCH (JC Holloway) on the end. The two dragonfly appliques could be removed, so I took the carts to Double R Powder Coating company for the final finish. Both carts were coated with a semi-gloss black hammer texture and the dragonfly appliques were powder coated in almond to provide good contrast. Double R had the carts done within the week and soon I had to borrow a different pickup to bring them home. Problem was, the first pickup I borrowed was a full size and this pickup was not. I could only fit one cart in at a time, so after two trips to Double R, both carts were in our garage. JC had made rails for the cart wheels to guide them into the bays as an enhancement. Sounded terrific...and “forced” me to go to Home Depot to buy a hammer drill to drill and bolt the rails in place (shopping has obviously become one of my favorite activities during this oven and den build). Problem with the rail enhancement/addition was that the bay sides were a little too tight at the end, so that cart could hit the side walls as it was moved into place (apparently my ability to build something that’s square and level is not to be trusted...nor my follow-up use of a tape measure).
So, back to my new favorite word, Kludge. I cut and glued some thin wood rails along the inside of the cart bays, so the carts would not be damaged when I moved them in or out. I did this for both bays and then found that the added height of the rails in the right bay made it impossible to use the cart–nuts! As usual, two steps forward–one step back. I removed the rails from the right side and now I could push and pull both carts into their respective bays as planned. I’m sure there was a lesson in there, but I certainly didn’t get it. On the bright side, the carts are fabulous for the oven. Great working top on the left side with storage underneath. The right side provides easy access to wood for the oven and its top works great to cool bread loaves or as a place to serve the pizza or focaccia or whatever...
The carts provide the perfect on demand prep and storage area, accessible wood supply for the oven, as well as presenting us a serving table top for the baked item(s) of the day. And the best part is the ability to shove them into their bays when not in use.
They are indeed our ... Rolling Wonders!
Above is a picture of the completed oven, still standing and working after 10 years!


